.png)
149 items found for ""
- Team Inbox
In this tutorial, we will look at the Sales Innovator Inbox tool. Inbox is a term used to describe where email messages are received in an email client. The Inbox is the default location for all incoming mail. Go to the navigation menu on the left side or top of the page and click on Inbox - Team Inbox. Priority Mails in All Inboxes - that is where the communication from the prospects you sent the email campaigns to is received. Please note that if you created several email addresses, the All Inboxes Priority Mails stores emails from all the created mailboxes. Emails in the Inbox are displayed and available to click or double-click to view. In addition, quick actions like deleting or forwarding emails are also made available from this screen. In this short tutorial, we looked at the Team Inbox. Thank you for being with us!
- Create Campaign
In this tutorial, we will learn how to create an email campaign for one or more senders to send to specific prospects or a list of contacts. An email campaign is a sequence of marketing efforts that contacts multiple recipients simultaneously. Email campaigns are designed to reach out to prospects at the best time and provide valuable content and relevant offers. In addition, using email campaigns allows you to build deep and trusting relationships with your clients. We invite you to visit the Playbook Library, where you can find playbooks on various topics to get your first campaign started. !To learn more, visit the tutorial! Click on the Start button next to Create An Email Campaign on the main page. A new page will appear, which will ask you to give a Campaign Name. You can also create campaigns by going to the navigation menu on the left side or top of the page and clicking on Campaign - Add Campaign. Write Campaign Emails After the name of the campaign has been saved, it is time to create an email campaign. It is written in the Add Your Engagement section and contains several steps. Start sending - here, select when you would like to send your campaign. Engage Every - allows sending your campaign every three days, every week, every two weeks, or every month. Engage At - select the correct timezone for your sender(s) to receive your campaign. If you have chosen to start sending the email campaign in the future, enter the date, select the time frame, and what days you would like to send the campaign. Exit Criteria - there are the following options to exit or not receive emails. Signature - you can create the signature, which will be added automatically for all the sent email campaigns. Click on Edit, and a new page will open to create the signature. Unsubscribe Link After the campaign parameters have been selected, it’s time to write the text of the email. Click on the BIG plus sign. A new page will appear, where you can write the text. For services listed on top of the page, such as LinkedIn, Facebook, etc., you can Add a Rule. When a prospect performs an action based on set rules, a task is created in the Task category for the sender. !Please refer to the Task Manager tutorial to learn more! Notice that the Send as a field by default has A new email thread type. When the text of the email is written and saved, it becomes listed as First Engagement. After the first one is saved, the tab to start the second engagement is automatically added to the list. When creating a Second Engagement, you should pay attention to the Send as a field. It is either A reply to the email thread or A new email thread. When the text for the second email is done, it will be saved as Second Engagement. So, now there are two engagements in one campaign under the name 50% off on Tulips. The first engagement with the subject line Holiday Special and the second - Free delivery! Each created Engagement has icons. The first icon edits the post The second one - deletes the post The last icon duplicates the post. The same post is added next to the original one. Add Your Email Recipients The list of contacts who you would like to receive the campaign should be created or imported to your organization in the Add Your Audience section. Contact - to add a new name manually. You only have to fill out the given fields. You decide what information to include in the contact’s profile. There is an option to select a category for the contact. It helps to keep your contacts sorted, which in turn makes the process of managing the business easier. !Please refer to the Add Funnel tutorial to learn how to create and add categories! Search - the second way is to search for contacts in your organization. File - you can use the third way when trying to add many contacts. First, download the example spreadsheet and use it to add your contacts to the spreadsheet. To upload many contacts, you must enter their first name, last name, email, phone number, company name, title, company URL, city, state, and country. Other fields are not mandatory. You can add as many people as you want to your file, and they will be added as contacts to your organization. Before the contacts get added, you will be able to preview the senders and ensure that all their information has been entered successfully. Once contacts are added, you will see them listed in the List. Here you can search for a contact, edit his details or remove it from the list. Send Test Email You are now ready to test your campaign by sending the emails (Engagements) to your email address. To do that, you need to click on the Preview section. You can select the campaign sender, view the contacts, and view the post in this section. To send a test email in the Test Send box, you enter your email address, select the posts (Engagements) you would like to send, and click on the blue Test Send button. You need to go back to the Add Your Engagement section and click on the Pencil icon of the engagement if you would like to edit your campaign. Send Campaign To Your Contacts When you are happy with your campaign and are ready to send it, click the blue Send button on the right top of the page in any section of the campaign. In this tutorial, you learned how to write an email campaign, add the list of your audience and send the emails to them. Now, it’s your turn to create an email campaign. Thank you for being with us!
- Manage Campaigns
Analyze the essential metrics in real-time and track the efficiency of your email marketing campaigns. An email campaign is a sequence of marketing efforts that contacts multiple recipients at the same time. Email campaigns are designed to reach out to prospects at the best time and provide valuable content and relevant offers. Using email campaigns allows you to build deep and trusting relationships with your clients. Go to the navigation menu on the left side or top of the page to access this report and click on Campaign - Manage Campaigns. The report allows you to view and track the following information: Who created the campaign; The campaign status: active, inactive, ended; How many senders sent the campaign; How many contacts the campaign was sent to; How many email messages (Engagements) are in each campaign (sequence); The number and the % of approved emails. When the sender of the email is different from the email owner, the owner must authorize the email; The number and the % of the future emails; How many emails were sent and their percentage of the total; How many emails had technical errors, and what is their percentage of the total. *Please note that with the growth of the campaign age, the number of sent emails goes up whereas the number of the scheduled ones decreases. See an example of the email that was created three months ago. And here is an example of the email written a month ago. How to Manage my Campaigns To manage a campaign, you can click on the Action tab. If your campaign has the status inactive or ended, then you will see these options: If your campaign is in the active status, then you will see these options: *Please note that you can make changes to the campaign only if it is not in an active status. If you need to make changes to an active campaign, the system will first ask you to pause it. How to Edit my Campaigns To make any changes to the campaign, you can click on the Campaign Name, which, in this example, is “50% off on Tulips”. The Add Your Engagement section of the Create Campaign page will open. Campaign Analytics To view a detailed report on a campaign, you can click on the Campaign Analytics button under the Action tab. The Dashboard section of the Create Campaign page will open, where you can see in detail the numbers and the results of your campaign(s). It is similar to the reports provided in the Dashboard section. The main difference is that you can run the report for each campaign and see the whole picture by moving through the tabs. Here is the snapshot of the tabs in the Campaign Analytics report. Now, compare it to the Dashboard section in the navigation menu. In this tutorial, we will look at the Email Status and CTA tabs. !To learn what data is given in other tabs, please go to the tutorials in the Dashboard section! The Email Status tab provides an overview of the data for this campaign. Scroll down, and you will see two more detailed reports. In the Campaign Sender Status, the report is sorted by the sender’s domain. !Remember, in Sales Innovator, you can add custom domains! In this example, the email campaign is ready to be sent. Under the Action tab, you can pause or delete it. The following report down this page, Campaign Sequence Status, allows you to view the data based on the email message (engagement) created for a singular campaign. !Remember that for each campaign, you can create more than one engagement! This report might look very familiar, and yes, you can see such a report by going to Dashboard - Emails in the navigation menu. However, this report shows only the emails created for this specific campaign, whereas the Dashboard section lists the emails for ALL the campaigns. The CTA tab lists the call-to-action links. Here you can filter by CTA Category and by the sender. The CTA Category lists the sections of the landing page where you might have created a CTA button. If there is any call to action button for this campaign, you can view the following data. In this tutorial, you have learned how to manage your email marketing campaigns and measure data to help you improve your email campaign strategy. Thank you for being with us!
- Campaign Calendar
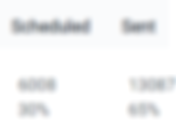
Discover how a campaign calendar helps you organize and analyze your email campaigns. With the help of this calendar, you can: Track when and who will or has received your emails; Summarize the results of your campaigns; Gather data on individual email performance; View the list of prospects and their reports. On the main page, click on the Start button next to Check Your Email Calendar To Verify Schedule. OR Go to the navigation menu on the left side or top of the page, and click on Campaign - Campaign Calendar. All your campaign emails are displayed in the campaign calendar. You can adjust email tracking to your needs by filtering the calendar according to a specific sender, domain, or campaign. In addition, you can view this calendar by month, week, day, or in the list mode. However you choose to view the information, the calendar will show all scheduled email campaigns. Example We are looking at the calendar with the selected specific domain name and campaign title. Plus, the week was chosen as a timeframe. !For security reasons, we covered any sensitive information! Domain and Email Scheduling Rules You might have noticed that rules were configured for this domain. If you have not yet set up domain and email rules in Settings, you can do it here by clicking on the Create Rules. In the popped-up window, you can select the domain, the start, and the end date of the Rule if you would like to. Then you can configure the setting for your email. It is important to read the following notification: "Email settings configured here will supersede all settings set at a campaign level and apply to all domain senders." You can enable the domain email warmup when the email settings are configured. What is email warmup? Warming up an email domain consists in gradually increasing the volume sent per day from this domain or email address and generating engagement to raise your sending reputation and show you're a good sender to the inbox providers and spam filters. In addition, email domain warmup helps you avoid a lot of bounced emails and signals your service provider that you are not a robot or scammer. The Domain Scheduling Rules in Sales Innovator opens up with the pre-filled fields that give the recommended value for that specific parameter. Campaign Emails Dashboard Let's return to our calendar. As you can see, the calendar displays the number of scheduled emails for selected dates and times of the day. By clicking on any green or gray cell, you will be taken to the report that will list prospects who have or will receive these emails. This report will not only list the prospects but will allow you to analyze the given key metrics. So, let's say that we would like to see who has received emails at 11 am on 5/16. !For security reasons, we covered any sensitive information! By clicking on this cell, we are taken to the three names of prospects. For each prospect, you can view: Name of the contact and the company name; Status; There are four status categories marked with a different color. Interested means that your contact has clicked on the call-to-action link to your phone number or social media profile; Engaged tells you that your contact opened more than two links from your email; Visited shows if the contact has opened one or two links from your email; Not visited means that your contact didn’t take any action. Status of campaign emails; Under the Campaign Emails tab, you can see the category of each email (sent, opened, closed, etc.) by hovering over any color. Number of viewed emails and average time spent on the email; Last activity; Last invite. Below are the types of invites. Scheduled shows the date of the future email to be sent; Sent - the date of the last sent email to the contact; Opened is when the prospect opened your email; Clicked shows that the contact clicked on the call-to-action button to get in touch with the sender; Bounced - shows the email which didn't reach the contact; Stopped - the prospect will no longer receive the campaign emails; Resumed - the contact will start receiving the campaign emails again. Sometimes, to be more effective at tracking the data, you might need to filter the report. For this reason, note that this report can be filtered by selecting the necessary filters. In addition, from the calendar, you can create a new campaign by clicking on the Create Campaign button. !To read how to create a campaign, please go to the Create Campaign tutorial! In this tutorial, you have learned how to track the scheduled campaign emails. Thank you for being with us!
- Create Content For Your Page
Find out how you can create and add the content for your landing page. Content is information and communication. It is the glue that keeps your audience to continue reading your campaign emails or your site. It keeps them from bouncing away to competitor websites. Between the written words, visual media, video, and more, content is the thing that keeps people interested in your message. Click on the Start button next to Create Content For Your Page on the main page. OR Go to the navigation menu on the left side or top of the page and click on Content - Create Content. A pop-up window will appear where you can choose the type of content you want to add. You can add content in the following ways: As a post with text and multimedia As a PDF As a link to a website, you would like to share As a link from your own website In addition, you can create and post the content by choosing a type that suits your business goal, such as social post, blog, video, podcast, article, email, newsletter, ad, event, training, etc. You can use some or all of these content types to build your message and share content with your contacts. To view a complete list of options, click on the drop-down menu. It can also act as categories of your content. Now let’s take a closer look at the types of content you can add. 1. The first type is to add as the Post To create a post, you add the title and compose the text for the post. Then, you can add content to the text by clicking on the Add Content button. Please note that you can add the content only if it has been previously uploaded into the system. There are options to add files at the bottom of the page, such as text, PDF, image, video, and IFrame. You have even more options to add to enhance the post on the right of the page. In the Settings, you can choose whether you want to Show the Author and Allow Download. From the Categories, you can add a new category to your posts. You can also add Tags, select a Featured Image to display on your landing page and write an Excerpt. When the post is created, click on the Post at the bottom of the page to save it. 2. The second type is to add as the PDF Here you can quickly add the PDF file you would like to post. Please note that this option allows you to only post files in PDF format. For this example, a PDF file was selected and added to the Content. Do not forget to add the title for the ease of finding the needed article for future posts. When you are done, click on Post at the bottom of the page. 3. The third one to add as the URL: is a link to a website you would like to share Include the link to the website you would like to include in your post. 4. And the last type is to add a link from your own website as the URL. In this tutorial, you have learned how to add content. Now you are ready to create your content! Thank you for being with us!
- Content Library
Analyze data in real-time, and manage and track the performance of the created content for your landing pages. Content is information and communication. It is the glue that keeps your audience to continue reading your campaign emails or your site. It keeps them from bouncing away to competitor websites. Between the written words, visual media, video, and more, content is the thing that keeps people interested in your message. Go to the navigation menu on the left side or top of the page to access this report and click on Content - Content Library. The report allows you to view and track the following information: The content’s title and its author; The type of the content (Email, Blog, Flyer, etc.); The content type you shared with your contacts; The number of views and the average spent time viewing the information; The number of likes and call-to-actions. How to Manage my Content By clicking on the three-dots button under the Action tab, that is where you can manage your content. Edit Content - you are redirected to your post for making any necessary changes. View Content - a pop-up window appears. You can choose if you would like to view the content on the landing page. Share Content - The content can be shared with your contacts. Duplicate - The post will open, where you must change the title and add any desired changes. Do not forget to click on the Post button. Download - The content will be downloaded as a file to your computer. Delete Content - The content will be removed without confirming the action. Filtering Parameters You can search for the post in the Content Library by choosing the necessary parameters. Type parameter Select the type of content you would like to see in your list. Please note that in the dropdown menu, you will see the types of content which you have in the content list. For example, if none of your content was added as a Blog, this type will not appear in the dropdown menu. All Pages parameter Choose the landing page you would like to see the content. Categories parameter Here you can select the category assigned to the needed content. Tags parameter If you have assigned any tags, please select. In this tutorial, you have learned how to manage your created content list and track its performance. Thank you for being with us!
- Companies List
Assess key indicators to see prospects' level of interest and manage the list of companies to better business organization. Click on Leads - Companies in the navigation menu. For efficiency, this report can be sorted by the Status filter. There are four status categories, and each is marked with a different color. Interested means that your contact has clicked on the call-to-action link to your phone number or social media profile. Engaged tells you that your contact opened more than two links from your email. Visited shows if the contact has opened one or two links from your email. Not visited means that your contact didn't take any action. The above screenshot shows the companies that clicked on a call-to-action link indicating that they are interested in the received information. This report allows you to see and track the following information: The company's name; How many contacts are associated with the company; How many campaigns were sent to the company's contacts; The status of interest; The number of views and spent time on the received content; Last activity. You can also add a new company or edit the company's name, logo, and link by clicking on the button under the Action tab. Under this tab, you can also choose to delete the company. To see the contacts from a company, you need to click on the company's name (first column), and you will be taken to the list of contacts, which will display the contacts from this company. !Please refer to the tutorial Contacts List to learn more about this list! You can also add a new company by clicking on the blue button Add Company. You can add the new company's name, logo, and website in the opened window. In this tutorial, you learned how to read data in the Companies report. Thank you for being with us!
- Compare Lists
This tutorial compares the lists of contacts, also known as mailing lists. A mailing list is a collection of the contacts' details, including the email addresses. When you are ready to send your email campaign, you will send it to one or more mailing lists. Therefore, a good mailing list is a key to successful email marketing. Comparing contact lists is essential because it helps avoid adding the same contact to mailing lists more than once. With the help of this tool, you can compare the newly created contact list with ALL the lists in your organization. Here we will also cover how you can manage the contact lists in the Compare Lists dashboard. Let's see how it works! In the navigation menu on the left side or top of the page, click Leads - Compare Lists. How to Compare Mailing Lists Click on Compare and follow the instructions. 1. Add the name and click Next. In this example, the name for the new list is Comparison List. 2. The email field has been chosen for comparison. 3. Depending on what you would like to compare, you can choose any list as the source list. We want to compare against ALL of the contact lists in this example. 4. Before you use this tool, the new mailing list you would like to compare should be in the Manage Lists dashboard. !Please refer to the tutorial Manage Lists to learn more! OR you can add the list now by uploading it. 5. After clicking on the Finish button, the Comparison List is added to the Compare Lists dashboard. The Comparison List is the result of comparing the new list (in this example, the Merge List) to all the mailing lists. How to Check the Results of the Comparison Click on the View Lists under the Action tab to view the comparison results. A window will appear, displaying two lists: the Source List and the Comparison List. And we can see that the two contacts in the Comparison List are also found in the Source List. The tool allows you to view the results by selecting the desired option. For example, you can view duplicates and unique contacts in either the source or comparison list. In addition, from the drop-down menu, you can select what columns you would like to display. For example, Unique (Comparison) shows no unique contact names in the Comparison List, which means that all the contacts are already in the Source List. The Duplicates (Comparison) lists the contacts already displayed in the Source List. How to Manage Compare Lists Dashboard Under the Action tab, click on the three-dot button. The following list of functions will show up: Edit - changes the name of the list Delete - removes the list View Lists - looks at the comparison result. In this tutorial, you have learned how to compare the lists of contacts. Thank you for being with us!
- Add To A List
This tutorial discusses adding contacts manually and importing them to the List of Contacts, also known as mailing lists. A mailing list is a collection of the contacts' details, including the email addresses. When you are ready to send your email campaign, you will send it to one or more mailing lists. Therefore, a good mailing list is a key to successful email marketing. Go to the navigation menu on the left side or top of the page to access this. Then, click on Leads - Add To A List. First, select the mailing list name to which you would like to add the contacts. Then, you can Add Contacts To A List manually, search and add the previously added contacts, or import them as a .csv file. In this example, the names will be added to the Holiday Special List. Contact - to add a new name manually, you only have to fill out the given fields. You can choose what information to include in the contact's profile. There is an option to select a category for the contact. It helps to keep your contacts sorted, which makes managing the business more accessible. !Please refer to the Add Funnel tutorial to learn how to create and add categories! Search - look for and add to the list a contact who has already been added to your organization. File - import contacts as a .csv file. First, download the example spreadsheet and use it to add your contacts to the spreadsheet. To upload many contacts, you will need to enter their first name, last name, email, phone number, company name, title, company URL, city, state, and country. Other fields are not mandatory. You can add as many people as you want to your file, and they will be added as contacts to your organization. Before the contacts get added, you will be able to preview the senders and ensure that all their information has been entered successfully. Once contacts are added, you will see them listed in the Contacts List. Under the Action tab, click on the three-dot button. You can edit the contact's profile, delete them entirely from the organization, or remove them from the list. In this tutorial, you have learned to add contacts to the mailing lists used to send email campaigns. Thank you for being with us!
- Manage Lists
This tutorial covers creating, merging, and managing the lists of contacts, also known as mailing lists. It also looks at how to add contacts manually and import them to the list. A mailing list is a collection of the contacts' details, including the email addresses. When you are ready to send your email campaign, you will send it to one or more mailing lists. Therefore, a good mailing list is a key to successful email marketing. In the navigation menu on the left side or top of the page, click Leads - Manage Lists. The Contact Lists dashboard does not contain any lists. Click on the Add Lists button to create a new mailing list. Add the name and the description of the list (optional) and save it. How to Add Contacts to a Mailing List After you've created a list, you can Add Contacts To A List manually, search and add the previously added contacts, or import them as a .csv file. First, let's add the contacts' names to the newly created Holiday Special List. Contact - to add a new name manually you only have to fill out the given fields. You can choose what information to include in the contact's profile. There is an option to select a category for the contact. It helps to keep your contacts sorted, which makes managing the business more accessible. !Please refer to the Add Funnel tutorial to learn how to create and add categories! Search - look for and add to the list a contact who has already been added to your organization. File - import contacts as a .csv file. First, download the example spreadsheet and use it to add your contacts to the spreadsheet. !Please refer to the Add Contact to the Contacts List tutorial to learn more! When a new Contact is added, their name appears on the list. Under the Action tab, click on the three-dot button. You can edit the contact's profile, delete them entirely from the organization, or remove them from the list. How to Merge Mailing Lists Click on the Merge Lists button and follow the instructions in the Manage Lists dashboard. 1. In this example, the name for the new list is Merge List. 2. The email field has been chosen for comparison. 3. Holiday Special List, which has two contacts, is used as the primary source list in this example. 4. You can select other lists to check for duplicates in the next step. 5. After clicking on the Finish button, the popup message appears. 6. The Sales Innovator sends an email. 7. The created Merge List is added to the Manage Lists dashboard. How to Manage my Mailing Lists of Contacts In the Manage Lists dashboard, click on the three-dot button under the Action tab. To manage the mailing list select what you would like to do from the below list. Import Contacts - the Add Contacts To A List shows what contacts are already in the list and allows you to add the new ones using the three ways discussed above. Edit - you can change the name and the description of the list. View Contacts - displays the contacts in this mailing list. Here you can track key metrics discussed in the tutorial Contacts List. !Refer to the tutorial Contacts List to learn more! Copy - the copy of the list is added to the Manage Lists. In this example, a copy Holiday Special List has been added together with its contacts. Delete - removes the mailing list. Download - the contact list is downloaded to your computer in the .cvs format with the contacts data. The contacts' details include the first and last name of the person, company name and its website, phone number, email, title, city/state/country, and social media profiles. In this tutorial, you have learned how to create, merge, and manage mailing lists used to send email campaigns. Thank you for being with us!
- Contacts List
In real-time, analyze important indicators about your contacts. First, evaluate the impact of every metric, including email views, last activity, the status of interest, and other activities. Then, manage and track the data performance. This report might look similar to the Prospects Dashboard one, but there is a difference. The Prospects Dashboard lists the contacts to whom the campaign email was sent, whereas the Contacts Dashboard contains all of the contacts ever added. Therefore, even if you decide to delete a contact from the Prospects Dashboard, it will remain in the Contacts one. You can find this report by going to the navigation menu on the left side or top of the page and clicking on Leads - Contact. Lead Scoring Report The report lists the contacts to whom you have sent the campaign emails. Then, it ranks them based on their level of interest, pushing those with the status Interested to the top and moving down to those with the Engaged, Visited, and Not Visited status. This ranking is called Lead Scoring. Please note that the Free Subscription Plan does not include Lead Scoring. The report allows you to view and track the following information: Name, title, and contact details of a person; Company name and website; How many campaign emails were sent to them; Category; You can assign a Category to each prospect. !Please refer to the Add Funnel tutorial to learn how to create and add categories! Status of interest; There are four status categories marked with a different color. Interested means that your contact has clicked on the call-to-action link to your phone number or social media profile. Engaged tells you that your contact opened more than two links from your email. Visited shows if the contact has opened one or two links from your email. Not Visited means that your contact didn’t take any action. Number of viewed emails and spent time on the email; Last activity; Last invite. Below are the types of invites for filtering. Scheduled shows the date of the future campaign emails; Sent - the date of the last sent email to the contact; Opened is when the prospect opened your email; Clicked shows that the contact clicked on the call-to-action button to get in touch with the sender; Bounced - shows the email which didn't reach the contact; Stopped - the prospect will no longer receive the campaign emails; Resumed - the contact will start receiving the campaign emails again. How to Manage the Contacts Report Click on the button under the Action tab. You will see the functions that will help you manage the contacts. Edit - edits the profile of the contact View Profile - the contact’s detailed report opens. !Please refer to the tutorial Prospects Dashboard to learn more! Send An Email - a very convenient tool to send an email to the contact straight away without going to the Inbox section. Share A Link - the Shared Link Dashboard opens. !Please refer to the Share A link tutorial to learn how to create and add categories! Delete - removes the contact from the list. Unsubscribe - removes the contact from the list of receiving the campaign emails. Mark As Bounced - mark those contacts to whom campaign emails did not reach. Pause Campaigns - stops sending the campaign emails for an undefined time. Filtering Parameters You can sort the list by selecting the necessary options, or you can search by entering the request in the search bar. Let’s take a look at each filtering parameter. Company parameter Status parameter There are four status categories marked with a different color. You can find the description of each type above. Campaign parameter If you have more than one campaign, this report allows you to see the sent campaigns to the contacts and filter by the campaign name. Sender parameter If you have added other senders who can send emails on behalf of your organization, you can filter the list of contacts by the email sender. List parameter When you add contacts to your organization by using the 'Import Contacts' option, you can filter your prospects by the name of the imported list. Last Invite parameter You can find the description of each type above. Category parameter You can create categories to assign to each contact, move that contact from one type to another, and filter by the category name to help you manage your business easier. In addition, here you can notice these icons: When selecting a contact, you can pause sending the campaign emails to them by clicking on the first icon. The second icon allows you to assign a category to the contact. The third one removes the contact, and the last one will enable you to download the selected contact(s) to your computer. In this tutorial, you learned how to manage and analyze data performance to optimize your business techniques. Thank you for being with us!
- Add Contact to the Contacts List
This tutorial looks at how to add contacts manually and import them to the Contacts List. Go to the navigation menu on the left side or top of the page to access this tool. Then, click on Leads - Add Contact. There are two ways of adding a contact to the database: manually (usually, this option is suitable for adding a small number of prospects) or by uploading a file into the system. How to Add the Contact Manually To add a new name manually, you only have to fill out the given fields. After all, it is your decision on what information to include in the contact’s profile. There is an option to select a category for the contact. It helps to keep your contacts sorted, which makes the process of managing the business simpler. !Please refer to the Add Funnel tutorial to learn how to create and add categories! How to Add a list of Contacts You can use the second way when trying to add many contacts. First, download the example file and use it to add your contacts to the spreadsheet. To upload many contacts, you will need to enter their first name, last name, email, phone number, company name, title, company URL, city, state, and country. Other fields are not mandatory. You can add as many people as you want to your file, and they will be added as contacts to your organization. Before the contacts get added, you will be able to preview the senders and ensure that all their information has been entered successfully. Once contacts are added, you will see them listed in the Contacts List. Here you can search for a contact, edit their details or remove them from the list. In this tutorial, you learned how you can add a small number of contacts manually and how you can import a list of people into the system. Thank you for being with us!